What is block-level delta copy?
The block-level transfer is an optimized method of file transfer that focuses on providing high-performance transfers across GoodSync Connect.
GoodSync Connect allows users to connect two computers directly, in a peer-to-peer fashion, without using intermediate servers to store files. This increases the speed of file transfer and enhances the privacy of your files by not storing them on 3rd party servers.
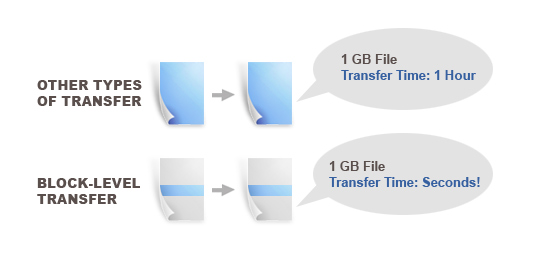
With block-level transfers, only the parts of a file that differ are transferred. When GoodSync identifies a file that has been updated or changed, it calculates the exact binary data within that file and sends only the changed information. By doing so, each file transfer only passes the data required to update the destination file. A normal file transfer would send the entire file, even if only small parts of the file have changed.
NOTE: For more information about GoodSync Connect, click here.
How to achieve block-level delta copy with GoodSync
Block-level delta copy can work on all backup and sync jobs between devices on which GoodSync is installed. For example: between two laptop computers.
Block-level delta copy cannot be achieved when backup and sync jobs are set up between a user's computer and a cloud storage service account.
There is no specific setting to turn the block-level delta copy feature on, but there are conditions that must be met for block-level delta copy to take place. When these conditions are met, block-level delta copy will take place automatically.
All GoodSync backup and sync jobs set under the four conditions listed below will have block-level delta copy feature on by default:
1) Both sides of the GoodSync job must have the GoodSync application installed.
2) Both sides must have selected to "Serve files to other devices" during account setup. If you did not select to serve files during account setup:
Windows:
Click the "Tools" menu at the top of the screen and then click "GoodSync Account Setup."
Input your login credentials and then click the "Log In" button.
You will then have the option to name your device as you wish, and select "Serve files to other devices." Once you have selected this option, click the "Next" button.
GoodSync will confirm your Account Setup has been completed. Click "Close" on this window.
Mac:
Click the "GoodSync" menu at the top left of the screen and then click "GoodSync Account Setup."
Input your login credentials and then click the "Log In" button.
You will then have the option to name your device as you wish, and select the "Serve files to other devices" option. Once you have selected this option, click the "Next" button.
GoodSync will confirm your Account Setup has been completed. Click "Close" on this window.
3) Both devices must be registered with the same GoodSync Account.
4) The GoodSync job must use GoodSync Connect.
To use GoodSync Connect, select "GoodSync Connect" on both the Left and Right side browse menus. If you have fulfilled numbers 1–3 above, you should see your account's email.
Click your account's email, and you should see the devices you have registered under your account.
From there, select the appropriate folders on the Left and Right sides for your Job and click the "Apply" button in the upper left.
Your job is now ready to Analyze and Sync.